
Last update: 2022-12-19
Using Tasksel
A tool can easy help you by installing desktop
apt install tasksel -yUbuntu GNOME desktop
tasksel

# or
apt install ubuntu-desktop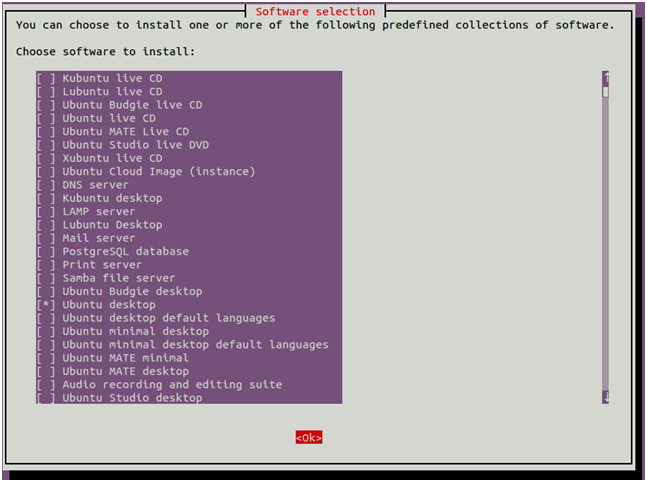
Use the arrow key to scroll down the list and find Ubuntu desktop. Next, press the Space key to select it then press the Tab key to select OK then hit Enter to install the Ubuntu desktop.
Ubuntu-Mate desktop
# Install

apt install ubuntu-mate-desktop lightdm

tasksel install ubuntu-mate-core

dpkg-reconfigure lightdm

service lightdm restart

# Remove
apt remove -y ubuntu-mate-desktop mate-* ubuntu-mate-* plymouth-theme-ubuntu-mate-* lightdm
apt autoremove -y
Xfce desktop (debian preferred)
The Xfce desktop environment can be used by itself. It’s designed to be responsive, lightweight and user-friendly.
apt install slim

apt install xfce4 xfce4-goodies gnome-icon-theme

dpkg-reconfigure slim

systemctl enable slim.service

service slim restart

## Blank screen debug

ls /usr/bin/*session
# Remove other ubuntu or mate session

cd /usr/share/xsessions

# If there are some xxx.desktop, rename them
mv ubuntu.desktop ubuntu.desktop.bak
VNC server setup
Step 1
Install tightvnc server
apt install tightvncserverStep 2
After the packages are done installing, we need to configure a username and password that will be used to connect to the VNC server by a client. Create a password with this command
# for root user under /root/

vncpasswd
Step 3
Next, let’s configure VNC to start the XFCE desktop environment when a client connects. Use nano or the text editor of your preference (ex. Atom, Sublime) to create the following file:
# Edit the file
nano ~/.vnc/xstartup

# Insert the following lines and save your changes

#!/bin/bash

unset SESSION_MANAGER
unset DBUS_SESSION_BUS_ADDRESS
vncconfig -iconic &

## XFCE only  ##

# xrdb $HOME/.Xresources
# startxfce4 &

## Ubuntu MATE only ##

# xrdb $HOME/.Xresources
# xsetroot -solid grey
# xterm -geometry 80x24+10+10 -ls -title "$VNCDESKTOP Desktop" &
# mate-session &

## Gnome desktop only ##

# unset SESSION_MANAGER
# unset DBUS_SESSION_BUS_ADDRESS
# xrdb $HOME/.Xresources
# vncconfig -iconic &
# exec /usr/bin/gnome-session  &
Step 4
With those changes made, edit the permissions of the file to make it executable:
chmod +x ~/.vnc/xstartupStep 5
VNC runs as a service on your system. In order for clients to connect, the VNC server must obviously be running and listening for incoming connection attempts. With our configuration complete, we are ready to start VNC server with the following command:
# Start VNC server listen on localhost port 5901 as :1

vncserver -alwaysshared -geometry 1680x1050 -depth 24 -localhost no

# Alternative
tigervncserver -xstartup /usr/bin/xterm -alwaysshared -geometry 1680x1050 -depth 24 -localhost no

# List all running vnc services

vncserver -list

# Kill VNC service
vncserver -kill :1
VNC Server autostart on system boot
You can simply add command below into your rc.local
nano /etc/rc.local

vncserver -alwaysshared -geometry 1680x1050 -depth 24 -localhost no

exit 0
SSH Port forward to access VNC securuly
ssh -i your-secure-key [email protected] -p 2222 -L 5901:127.0.0.1:5901Install Xrdp on Ubuntu
Xrdp is an open-source equivalent of Microsoft’s Remote Desktop Protocol (RDP). With xrdp installed on a Linux system, users can remotely access the Linux desktop using an RDP client as we shall demonstrate later in this article. It’s completely free to download and use.
# Install xrdp
apt install xrdp

# Add user for xrdp
adduser xrdp ssl-cert

# Xrdp listens on port 3389
ufw allow from 0.0.0.0 to any port 3389
ufw reload
ufw status

# Fix black screen
nano /etc/xrdp/startwm.sh
# Add following lines
unset DBUS_SESSION_BUS_ADDRESS
unset XDG_RUNTIME_DIR

# Save and chmod +x
chmod +x /etc/xrdp/startwm.sh

# Restart xrdp
systemctl restart xrdp
Switch between LightDM , Slim and GDM in Ubuntu
Open a terminal and use the following command:
dpkg-reconfigure slimYou can in fact use lightdm instead of slim, the procedure is same for both. Using the above mentioned command will take you to a warning page. Enter to get back to next screen:
Install Alacritty Terminal Emulator via PPA in Ubuntu
Alacritty is a cross-platform, GPU-accelerated terminal emulator works on macOS, Linux, BSD, and Windows. It’s free and open-source software that strongly focus on simplicity and performance.
To install the software, there’s a PPA repository contains the latest packages for Ubuntu 20.04 and Ubuntu 20.10. Also an old version is available for Ubuntu 18.04.
1. Open terminal from your system application launcher. When it opens, run command to add the PPA:
sudo add-apt-repository ppa:aslatter/ppa
Type user password (no asterisk feedback) for sudo prompts and hit Enter to continue.
2. While adding the PPA will also automatically refresh system package cache, run apt command to install the terminal emulator:
sudo apt install alacritty
3. Uninstall Alacritty
apt remove --auto-remove alacrittyReferences
- https://linoxide.com/install-configure-vnc-ubuntu-20-04/
- https://github.com/TigerVNC/tigervnc/issues/684
- https://itsfoss.com/switch-gdm-and-lightdm-in-ubuntu-14-04/
- https://tecadmin.net/install-vnc-server-on-ubuntu-20-04/
- https://www.tecmint.com/install-xrdp-on-ubuntu/
- https://linuxconfig.org/vnc-server-on-ubuntu-20-04-focal-fossa-linux
- https://phoenixnap.com/kb/how-to-install-a-gui-on-ubuntu